| By Manavi Pandeyin Business Guides|Reader DisclosureDisclosure: Our content is reader-supported. This means we may earn a commission if you click on some of our links.
The next time you are at a Starbucks, look around and you will be able to find someone working on and creating their online stores while sipping their coffee. Everyone ranging from top companies to individual sellers is looking to get their stores online. The ecommerce technology of selling and buying things has been around since the 1990s, so if you’re just entering the game now, read on to find out how you can create your very own online store in a few minutes.
The first step toward creating your successful online store is to narrow your business niche. If you have already ascertained your product and consumer niche, then you may skim through this section and move right ahead to the next sections.
Narrowing your business niche refers to finalizing two things:
Finalizing What Audience You Want To Sell To
To finalize your target market, you must conduct consumer analysis and answer the 5 Ws –
Who is going to buy your product?
What are your consumers’ expectations?
When do your consumers buy your product? How often?
Where do they live?
Why do they buy that? Is it because your product is a need or a luxury?
Finalizing what products are you going to sell
In order to set your hand on the right product to sell, you need to keep in mind the product-market fit. The product-market fit focuses on two things –
Desirability – This means your product should have a potential desire in the market. You can finalize a product based on the ‘consumer wishlist’. You should sell a solution. For example – What did Uber do? They heard the wishes of consumers to be able to book a cab sitting in the comfort of their house instead of physically going to a cab station or auto station. Another way of catering to desirability is the finalize a product as a way of telling the consumer that your product is their ‘need’ and not just a ‘want’. Focus on products that are just a ‘want’ but you have the potential of creating them into a ‘need’. Pretend your product is a need for long enough and soon it will be true.
Feasibility – This means that your product should have the ability to satisfy a need for the people. For example – Pepsi AM was a drink by Pepsi Co. which was to be a breakfast drink and with cereals. But it failed miserably. Why? Because of one reason, that even though the market for soft drinks is huge nobody wants to have it with cereals in the morning.
Now that you have clarity on what is your target market, customer segments, and products to sell, comes the question –
‘How to sell the product to the audience?’
To ascertain the ‘how-to’ aspect, you must know what kind of business model you will adhere to.
Types Of Ecommerce Business Models
The next step toward building an online store business would be to establish what kind of ecommerce business model would you follow? In case you have finalized your ecommerce business model and are determined to go ahead with it, be sure to skip this step and move right ahead to the next segment.
There are 3 main ecommerce business models include:
Dropshipping business model
The dropshipping model is by far the most widely used ecommerce business model, propagated by Shopify, Aliexpress, etc.
This is where you create the platform that ‘lists’ all products for sale, and the actual product is taken care of by the partner brand. Your agenda includes – branding, marketing, sales boost, and promotion. The drop shipper is like a wholesale supplier, whose agenda includes – inventory management, delivery, and handling of the product.
The advantages of a dropshipping business model are:
Don’t need to manage, stock or organize inventories, so it is easy to start with.
Allot more focus on marketing and branding.
The location of the customer does not affect the business
The disadvantages of a dropshipping business model are:
Less control over the quality of product and services
Dropshipper may be supplying the same product to numerous sellers like you. Therefore, you might not be a unique seller.
Involves extra costs initially
Minimal to chances of catering to other businesses (b2b)
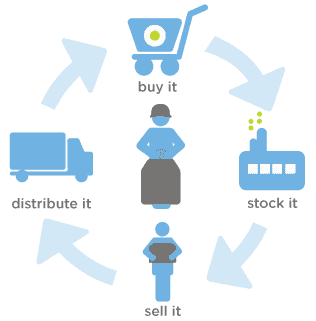
You purchase the product from a manufacturer/middleman at a discounted rate
Store it in your warehouse and manage your warehouse
Market the product
Sell the product
Source – Nucleuslogic
The advantages of the wholesaling and warehousing model are:
Magnifies control over every aspect of business
Ability to build exclusivity of products
Sell your products in a high volume
Cater to other businesses (b2b)
The disadvantages are:
Requires heavy upfront investment
Requires undivided attention toward inventory stocking, management, marketing, delivery, and sale
White-Labelling And Manufacturing Business Model
As the name suggests, this business model permits you to partner your manufacturing with others but simultaneously label your name as the manufacturer of the product.
For instance, when you visit Walmart, you see products under the ‘Great Value’ brand, which is Walmart’s own brand. Does this mean that Walmart produces all of its products?
Actually, no.
Great Value is just the white label put onto products by other supplier companies to Walmart.
The advantages of white-labelling manufacturer model are:
It saves time on developing its own products by picking up products from existing suppliers
As a white-label manufacturer, you may not be aware of the information of the product and end up passing incorrect information
For instance, a white label chocolate manufacturer may not know that the chocolates being supplied to him are created in a factory where nuts are processed too. Therefore, the white label manufacturer might not place a ‘nut allergy warning’ on the chocolate.
Choosing A Company Name
The last steps toward creating an online store include choosing the right company name for your store. If you do believe that you have a perfect company name ready, you may want to skip this section and get your hands dirty with the next section on ‘building your online store’.
The bad news here is that almost everyone hates this step and ends up skipping it. The journey to finding the right store name can be tricky and annoying. Fret not, because this section will only to ease your stress and confusion. Be sure to check off everything from this checklist to find your perfect match:
Pick a name that is easy to pronounce and easy to spell Try to make sure your store name is spelt how it sounds. Complex names may push people away, and make people type the wrong name in a search box.
Do the bar test The bar test means that people should be able to pronounce and understand your store name easily in a noisy bar. For instance, amidst a lot of noise will it be easier to talk about the sound enhancement brand ‘Bose’ or ‘JBL’ than ‘Portronics’.
Check .com availability Variety of other domain endings like .cos are gaining popularity, but people still tend to type in .com with the most ease. Therefore, make sure that the name you set eye on is not already taken.
Limit the length to 1-3 words It is highly recommended that a successful store name must have 3 words ‘at most’. Most than three words created difficulty to remember, pronounce, and type.
Relate it to your business You don’t have to pull your hair over this one, because the important thing to note here is that the store name must not be too farther away from your business. Your store name may not mandatorily have a direct relation to your product/service, like Zomato is a food delivering service and played with the word ‘tomato’ to come with its name.
Building Your Online Store
Gone are the days where you need a big ‘shopping’ board and rent a shop to start your store. There are numerous platforms available for you to create your ecommerce store. A walkthrough guide of the two most popular ones – Shopify and WooCommerce, has been described ahead.
Using Shopify
Shopify offers a monthly subscription of $29/ month, which allows you to build a completely functional online store to sell your products.
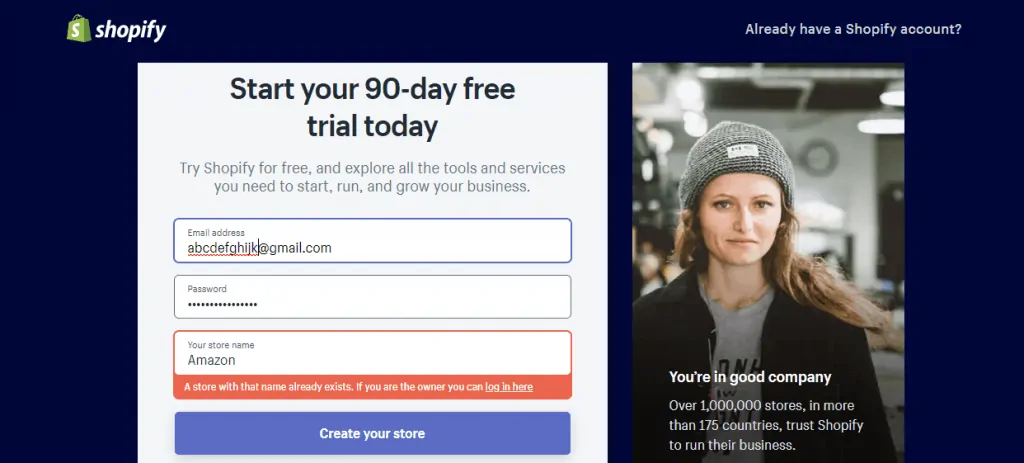
Step 1: Sign up
Sign up on shopify.com. Here, make sure you enter an original and unique store name else it would show a message – “A store with that name already exists. If you are the owner you can log in here”.
After clicking on ‘create your store’, it would ask you more general questions about your annual revenue figures, your industry (Electronics, Food & Drink, Home & Garden, etc.), your name, address, etc.
Once you are done, click on ‘I’m done’.
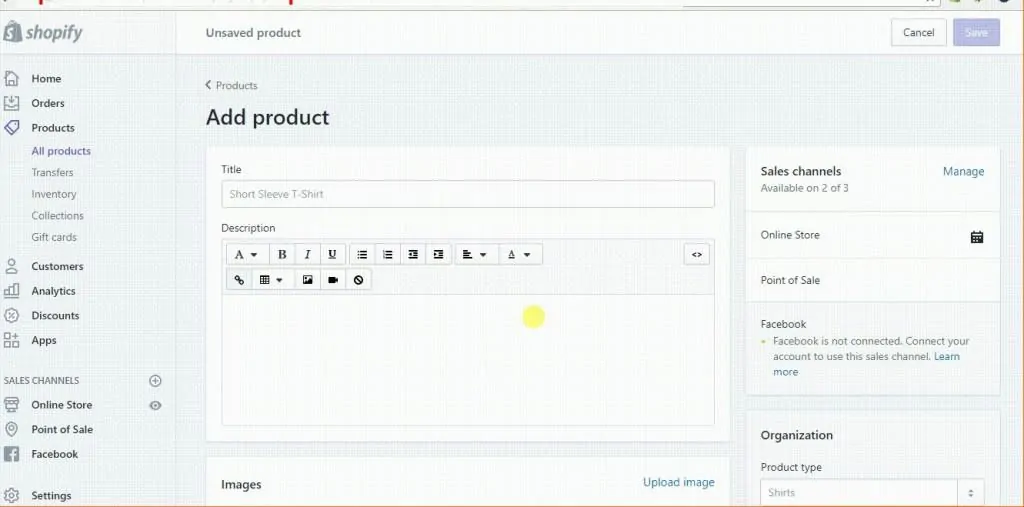
Step 2: Add products to your online shop
After the sign-up process is complete, you will be directed to the admin screen. Using the menu on your left, you can upload the products to your store.
To begin adding products, click on the ‘All products’ option from the ‘Products’ drop-down in the left menu pane.
Source – wisemerchant
Here you can add the title, description, image, price, available quantity, and cost per item. You can also add inventory details like the ‘stock keeping unit’ and ‘barcode’. You can also add the shipping details, like weight, etc. Lastly, it asks for customs information where you have to enter the ‘country of origin’ and the ‘HS code’ of your product.
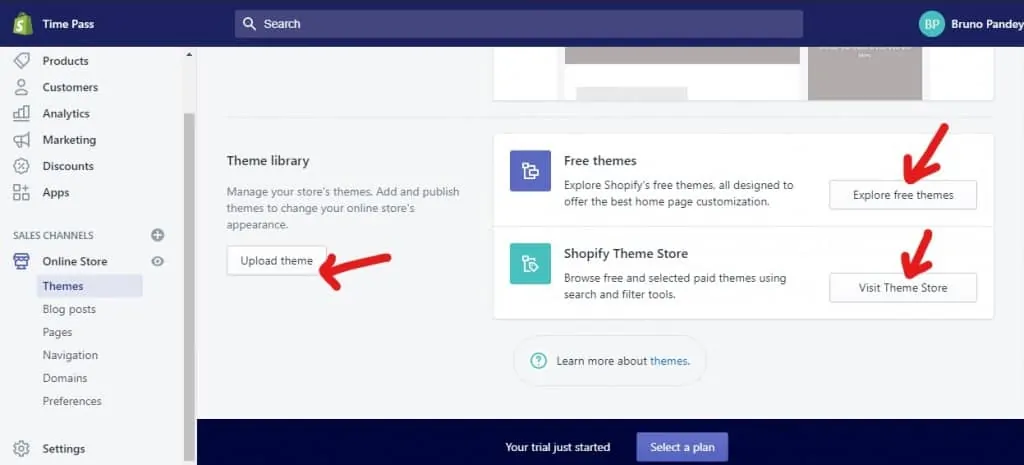
Step 3: Customising your theme
Now to set your theme to your online store, click on ‘Online Store’ under ‘SALES CHANNELS’ from your left menu pane. This will open up the themes page and scroll down. In case you have a ready-made theme you can use the option ‘Upload theme’ option or else you can use the following –
For free themes – ‘Explore free themes’
For paid themes from Shopify Theme Store – ‘Visit Theme Store’
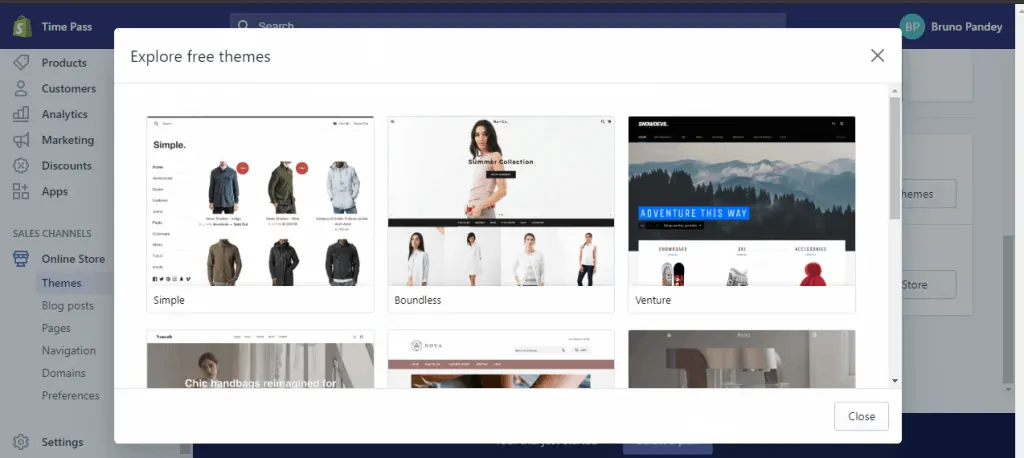
If you decide to explore free themes, a pop-up window would show you about 8 free ready-made themes from Shopify, which should look like this:
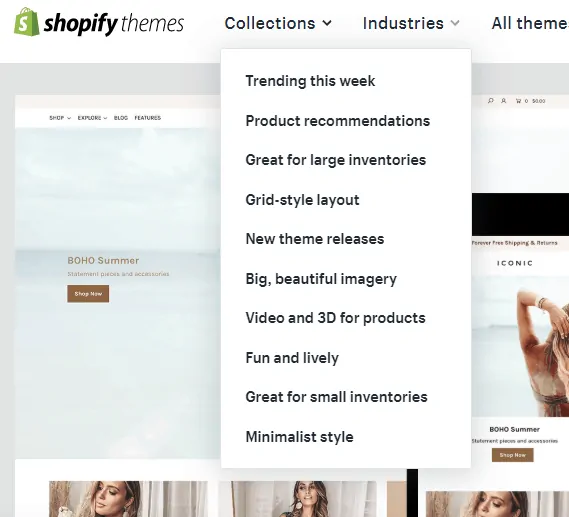
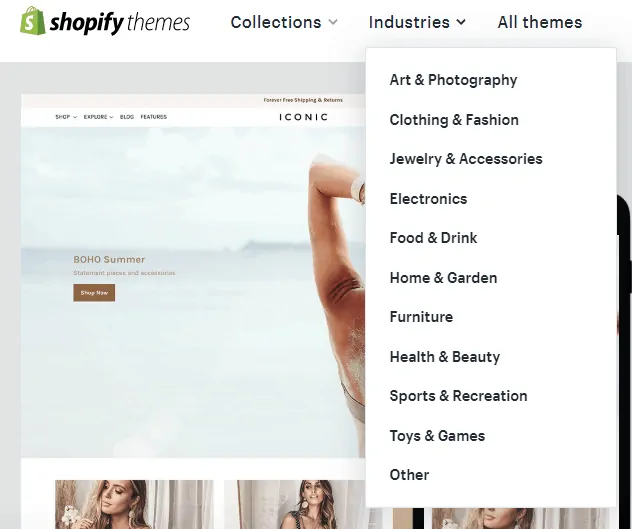
If you decide to explore the Shopify Theme Store you can browse ‘Collections’ wise or ‘Industries’ wise in these ways:
Step 4: Finalising your store theme
After selecting themes you can check more details about the theme such as:
Responsiveness
Mobile ready or not
Reviews by past users
After selecting your theme you can use ‘View Demo’ and see a preview of the theme. If the preview seems appropriate:
Click the green button
Install the theme
Click on ‘Publish as my Shop’s Theme’
Note: You can always change the theme anytime in the future.
Step 5: Payment Gateways – Non-Shopify payments
The last step before your shop goes live would be to activate the necessary payment gateways that you need. To do this, select ‘Settings’ from the left menu pane, and click on ‘Payments’.
Next, you can select what gateway you want to make available for your shoppers:
PayPal
Third-party providers – This includes Stripe, Adyen, PayU Money, CyberSource, Paysafe, SecurePay, etc. It will also show you which third party payment provider is available in your country or not.
Alternative payment methods – This includes Razorpay (Cards, UPI, NetBanking, Wallets), Splitit Monthly payments, PayTM, etc.
Manual payment methods
When deciding what payment method to choose, make sure you keep in mind 3 important points:
The transaction fees charged by respective payment gateways
The card types
The offsite checkout process of the respective payment gateway. Where does the payment gateway re-direct your customers? Is the re-direction difficult, easy, expensive, etc.?
Step 6: Payment Gateways – Shopify payments
To enable Shopify Payments, make sure you have the following details ready:
Your Employer Identification Number (EIN)
Your bank details
The average price of your orders
The average shipping time of your orders
Following the same steps as the previous section set up Shopify payments :
Settings
Payments
Payment providers
Shopify payments
The advantage of using Shopify payments is:
You can receive all payments of your orders immediately or set a pattern like weekly, monthly, a recurring date, etc.
There is no subscription or transaction fee
Integrate other payment providers – Using Shopify Payments doesn’t mean that you cannot link other payment providers. You can still let users pay through other gateways like PayPal.
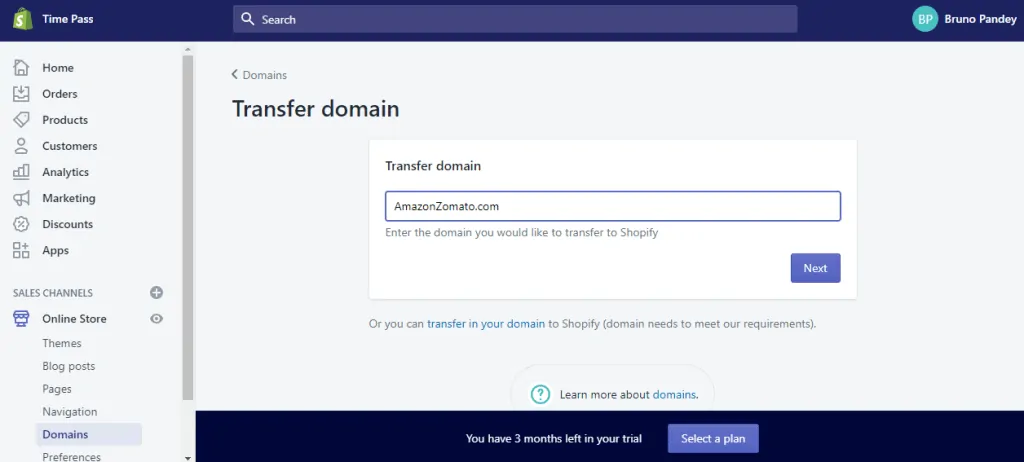
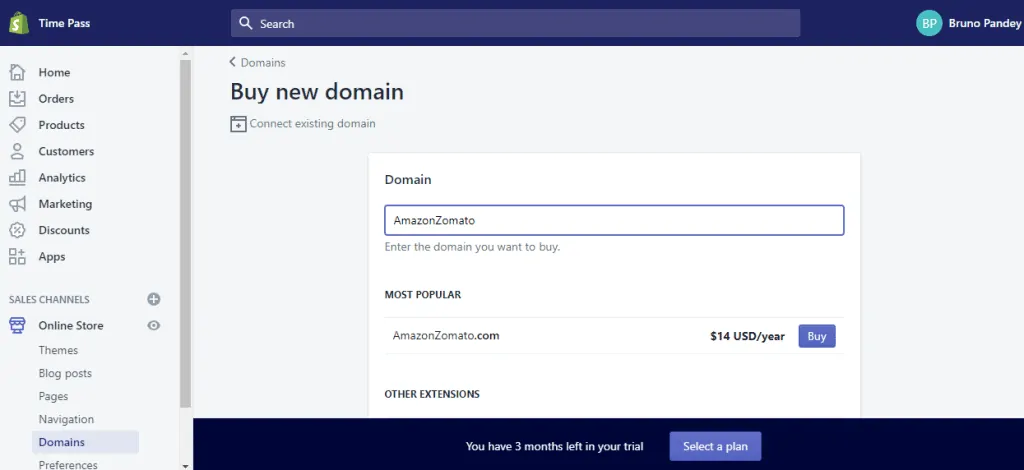
Step 7: Choosing a domain name
After you have finalized your design theme, payment gateways, its time for the last step –
‘getting your domain name’
Click on ‘Domains’ from ‘Online Store’ under ‘SALES CHANNELS’ in the left menu pane. Your domain name would already be the one you created in the first step, but in case you want to change that, you can select any of the following options:
Connect existing domain Using this option, you can connect the domain you might have created in the past on platforms like Namecheap, Bluehost, Godaddy, etc. (as they are less pricey there). Remember this cannot be an existing Shopify domain.
Transfer domain This option lets you transfer the data and details from an existing one to your new Shopify domain. The ‘connect existing domain’ only merges your existing domain with the new Shopify domain, but this option ‘transfers’ all details, provided you meet the Shopify terms and conditions.
Buy new domain This option lets you buy a new domain from Shopify.
Step 8: Getting your shop up and running
Lastly, you can finalise your products and payment gateway and hot ‘Publish’ from your Shopify dashboard.
Using WooCommerce
WooCommerce is very flexible, affordable, and easy to manage. Though it might seem more complex than Shopify, WooCommerce is:
Cheaper than Shopify in the long-run
More available customisation in terms of technicality and back-end processes
WooCommerce is behind 7% of all online stores, and 22% of the top 1 million online stores. It is a plug-in that is included in the plug-in package of any self-hosted WordPress website.
If you are looking for easy, real and to-the-point guidelines for opening your store with WooCommerce, dive right into the following steps:
Step 1: Connecting with WordPress
The main pre-requisite to starting a WooCommerce is store is having a Wordpress site ready and live. By following the quick and easy steps on ‘building your website with WordPress‘ you can get started with the process. In case you already have your WordPress site ready, make sure it is from wordpress.org and not wordpress.com because the .org version is :
For self-hosted sites
And the one with the WooCommerce plug-in available
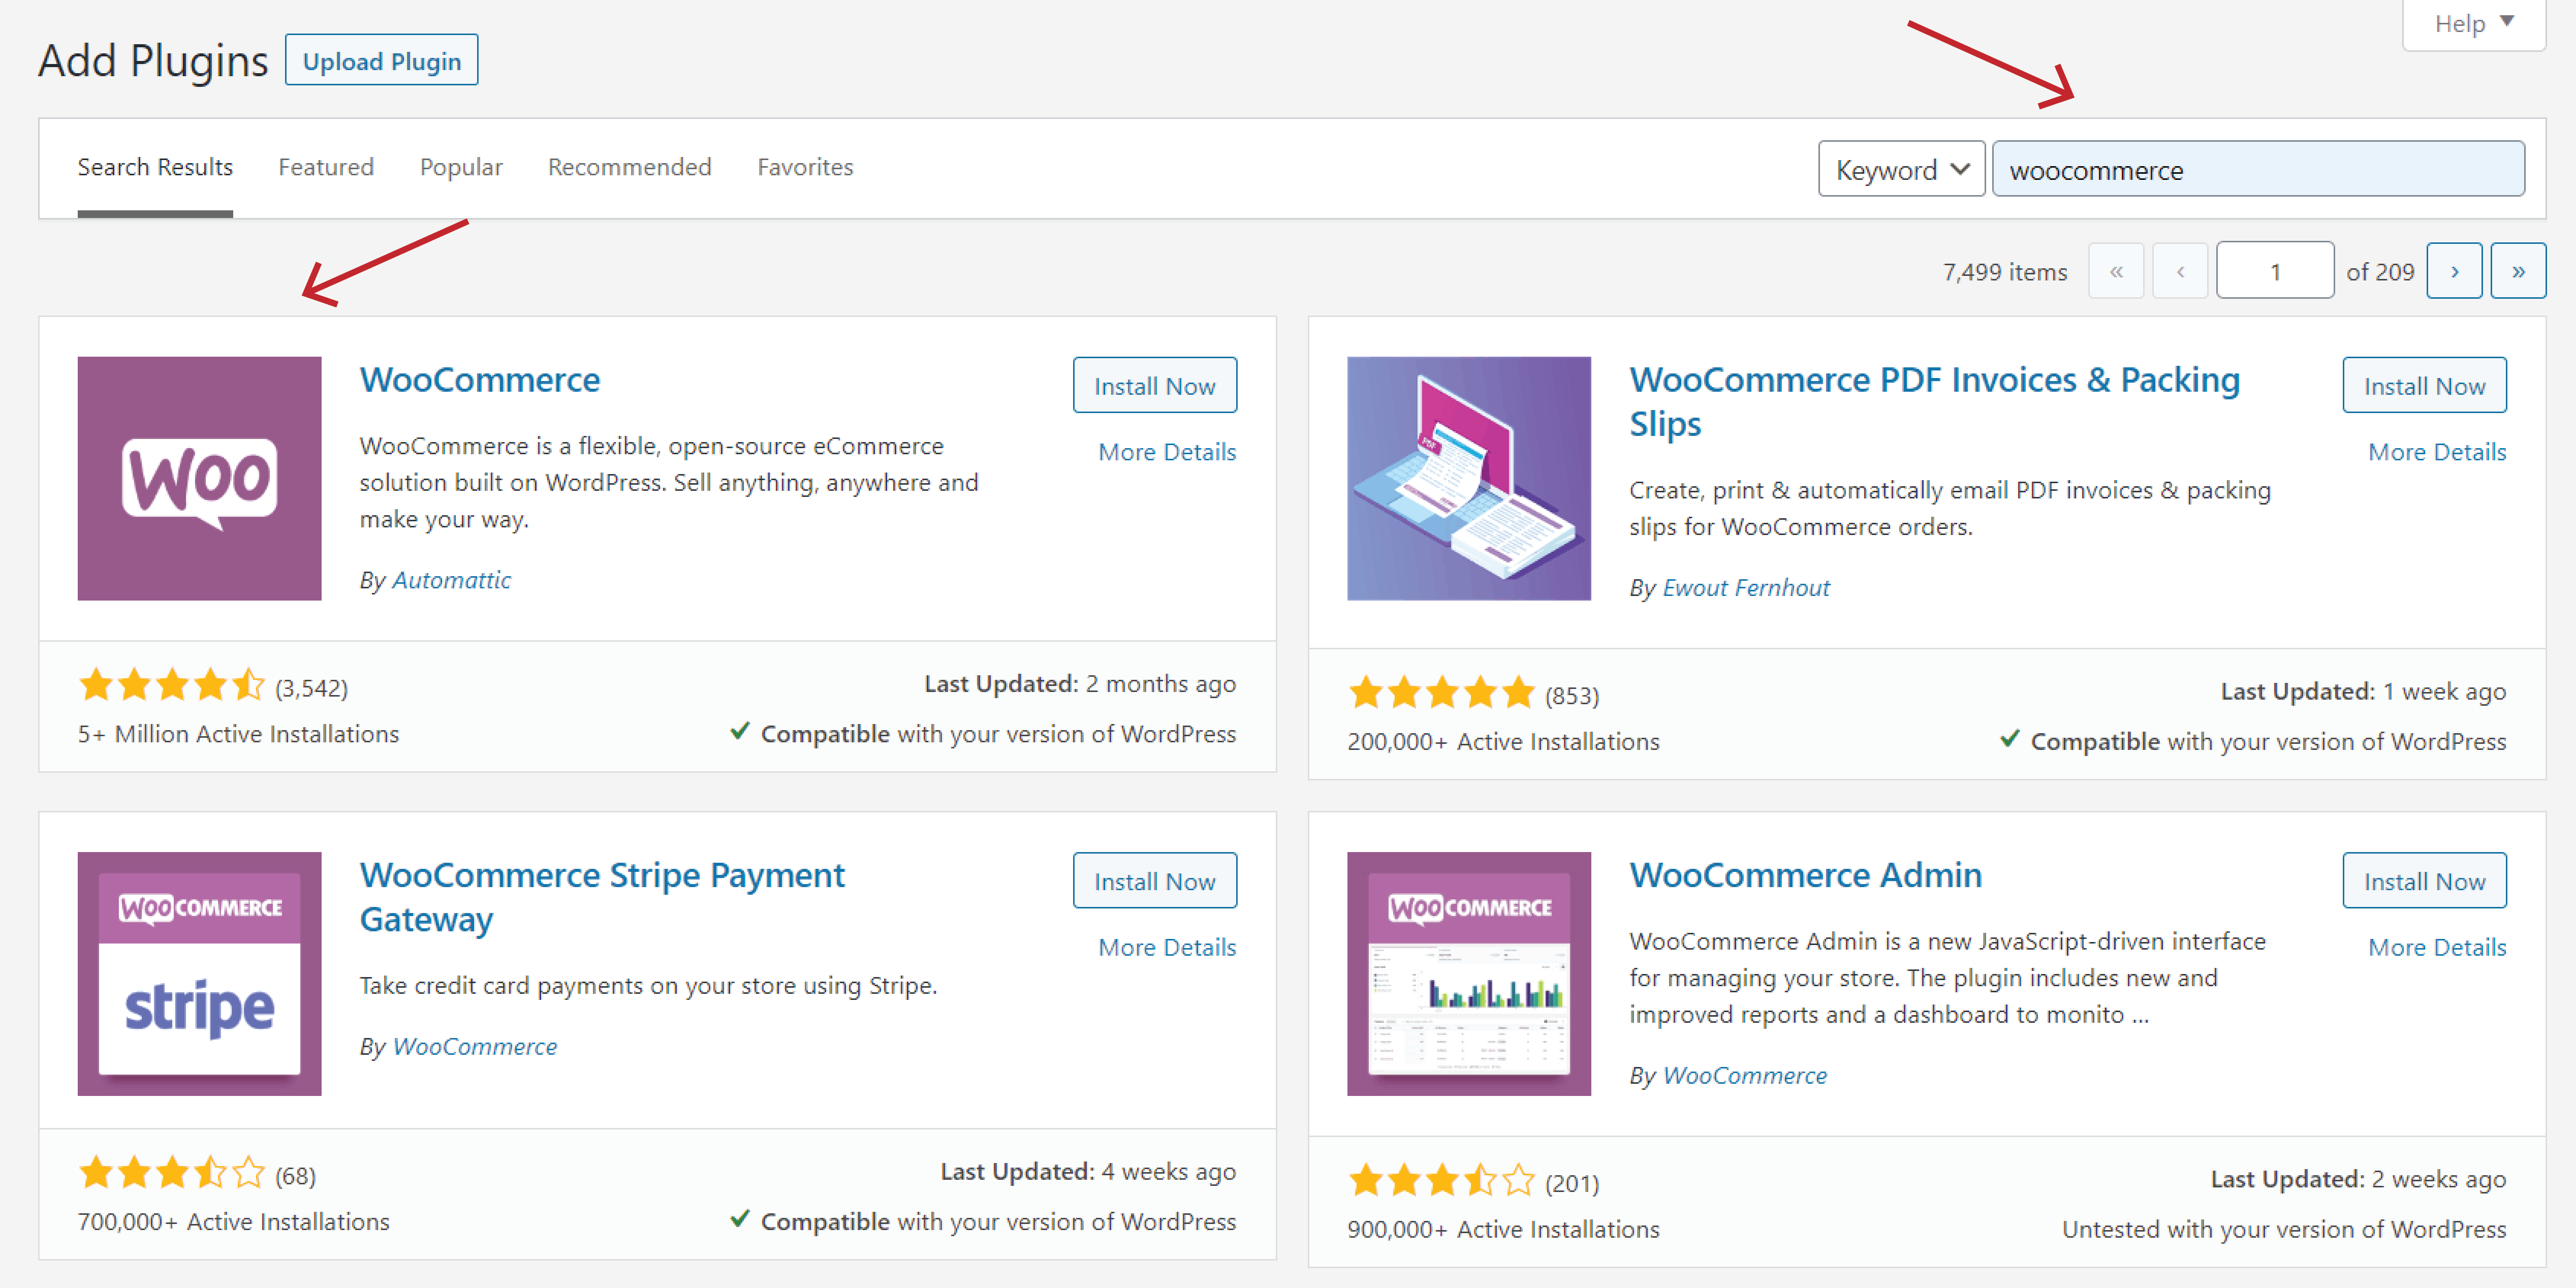
Next, navigate to plug-ins and click on ‘add new’.
After that, you can use the search bar and search for ‘WooCommerce’. Click on ‘Install now’ for the right WooCommerce plug-in, as shown below.
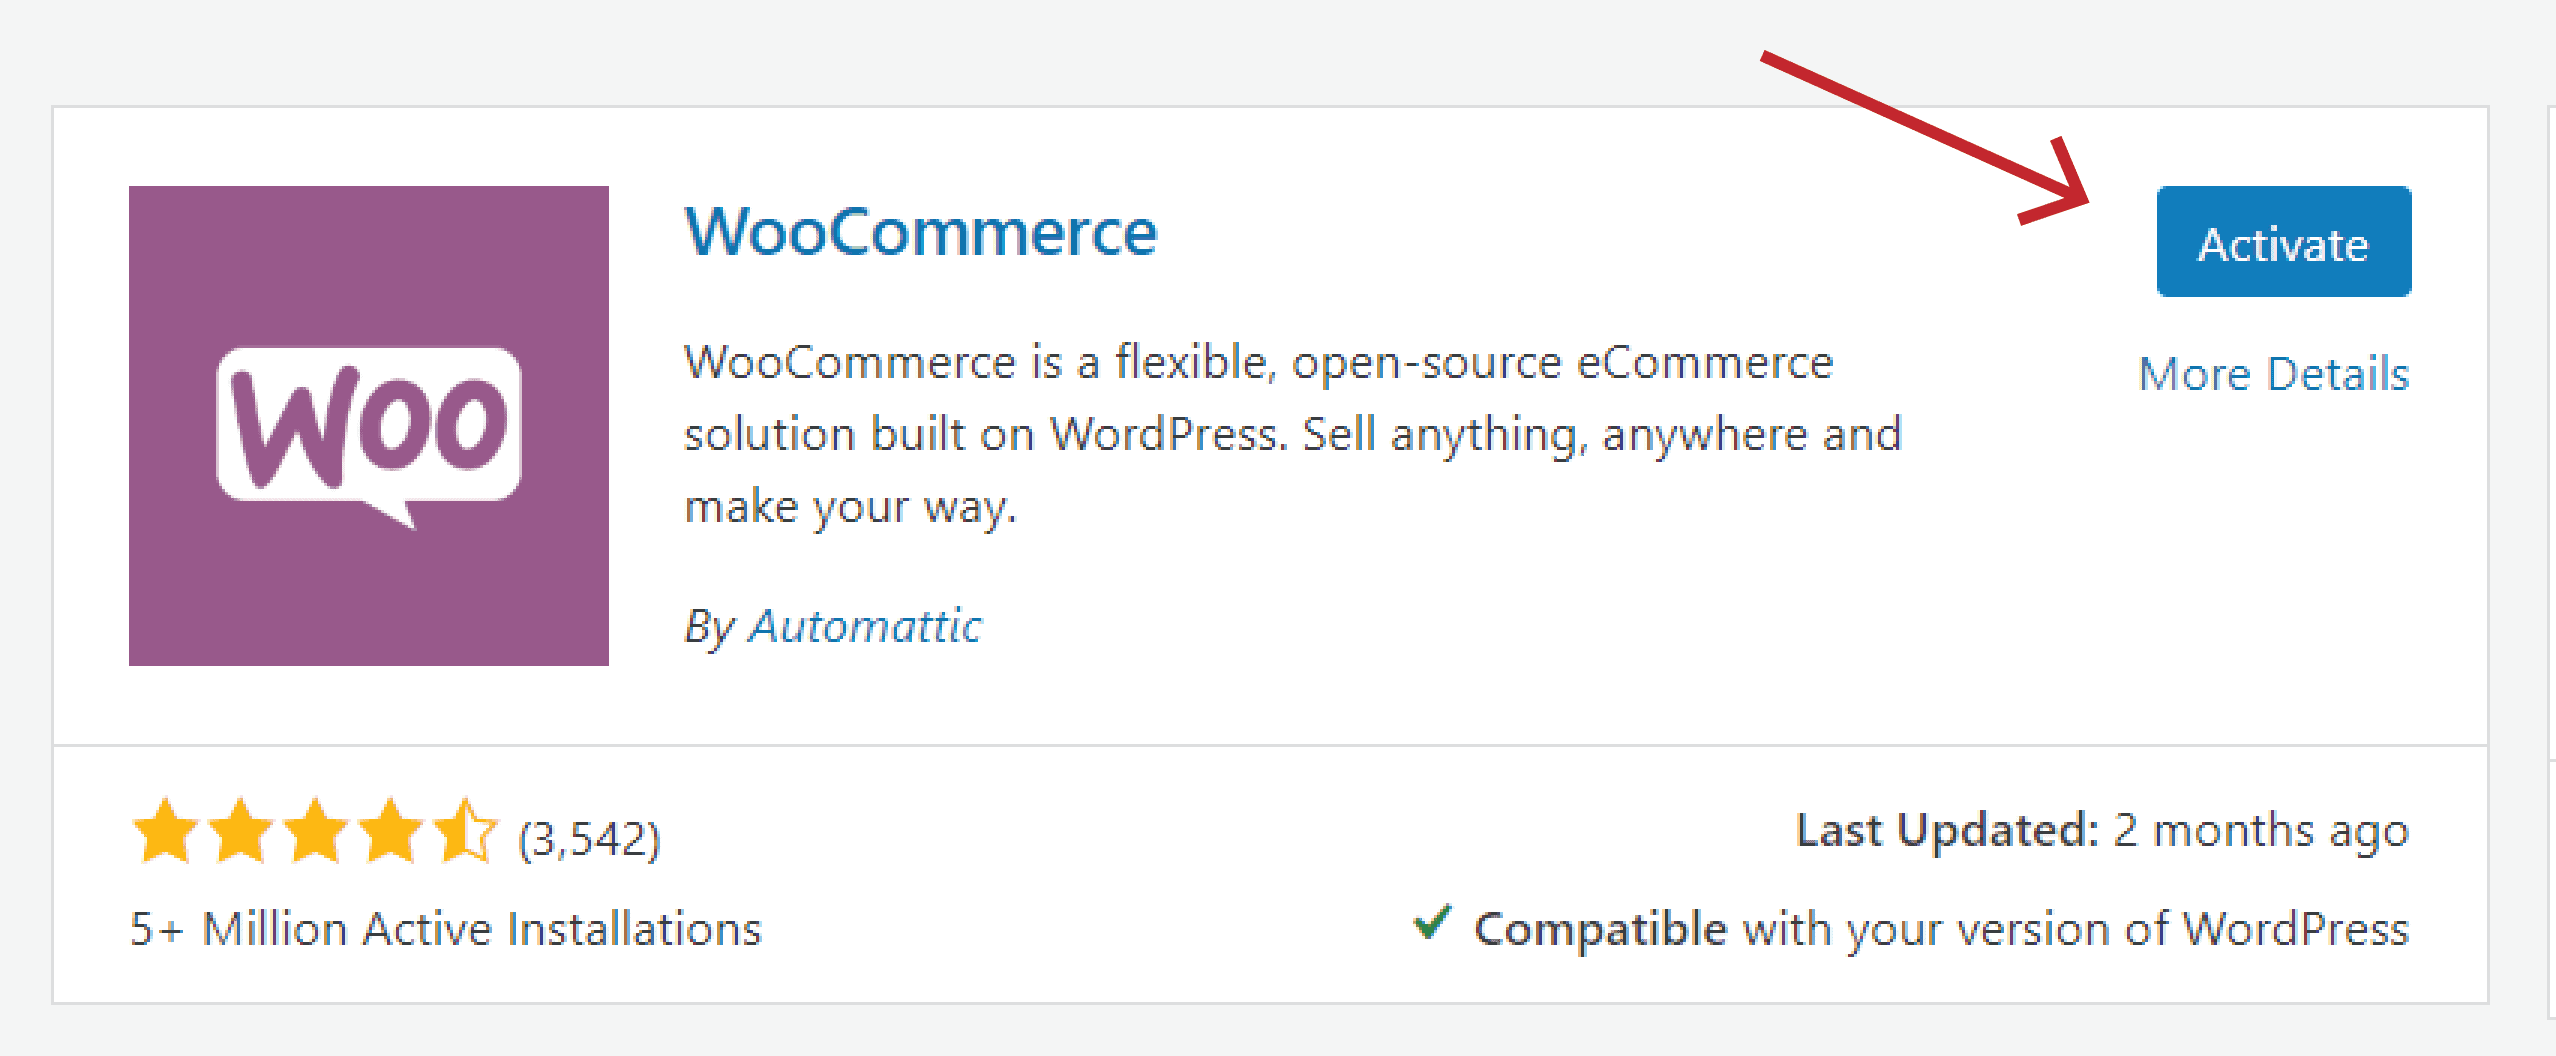
Wait for a few moments for the plug-in to install and then when you see the ‘Activate’ button, select it, and your plug-in will be up on your WordPress site!
Step 2 – Complete the Setup Wizard
To find your way through some important settings, we would recommend the walkthrough with the setup wizard, though it is completely optional.
The first page of the setup wizard – Basic details
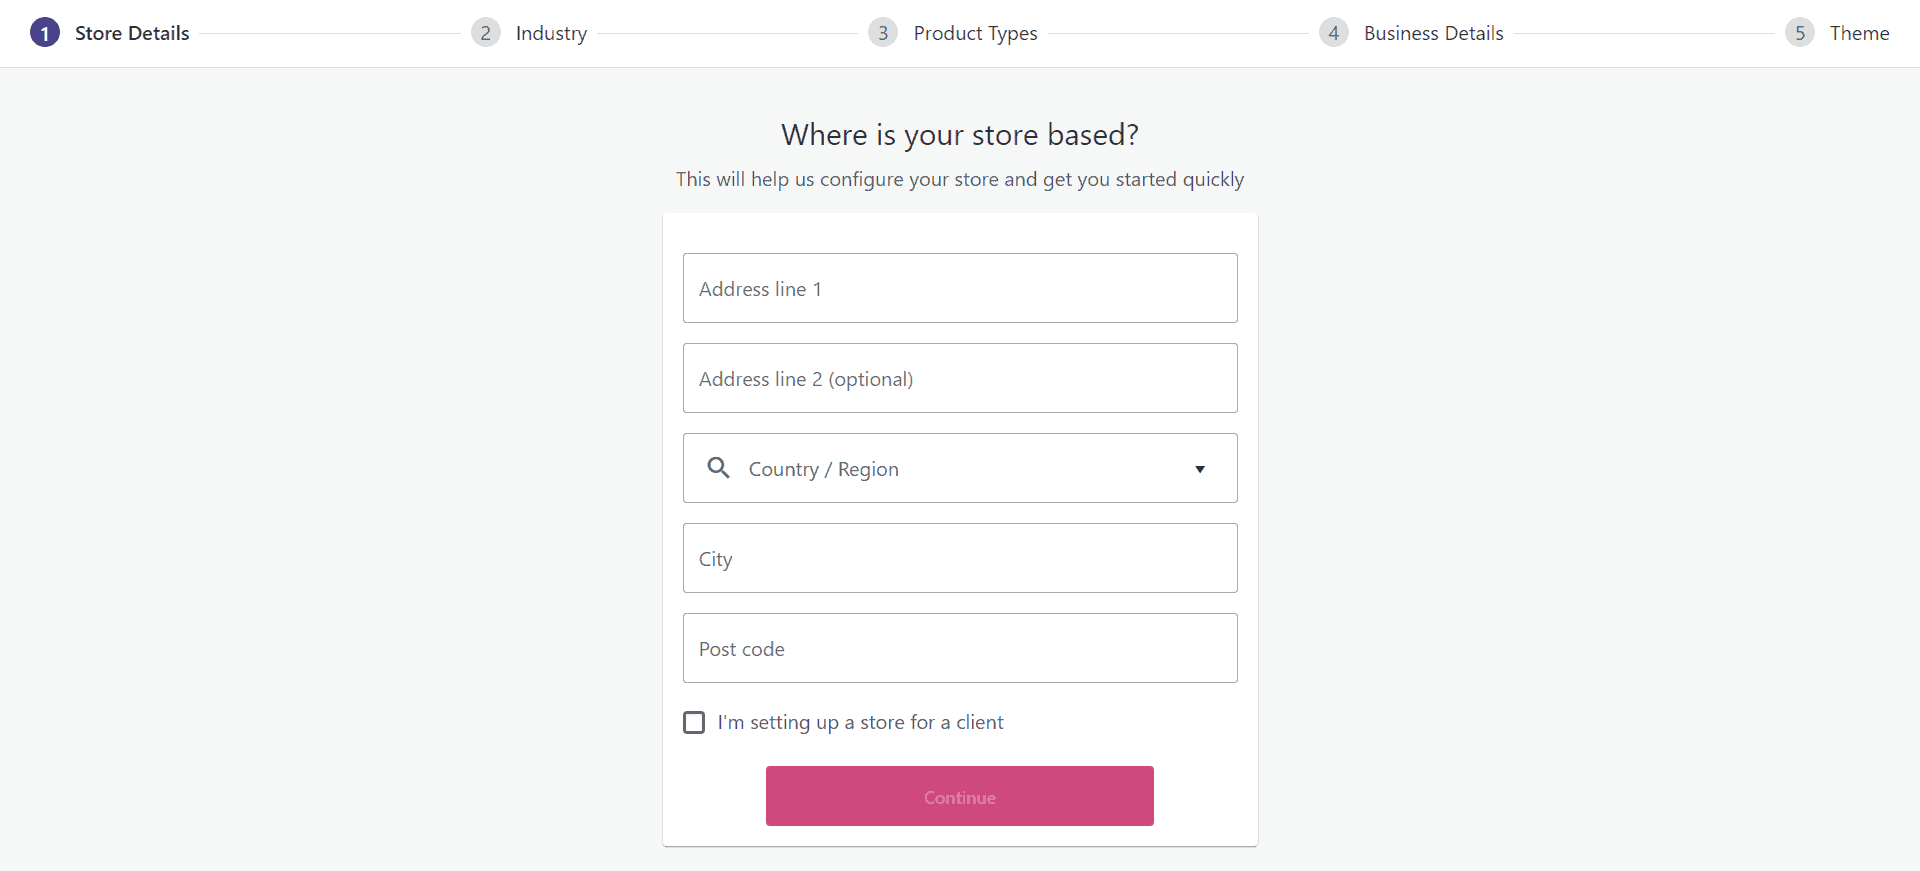
The first page of the WooCommerce set-up wizard would ask you for some basic details like your city, pin code, country, etc.
You can always change all these details even after your store is up and running!
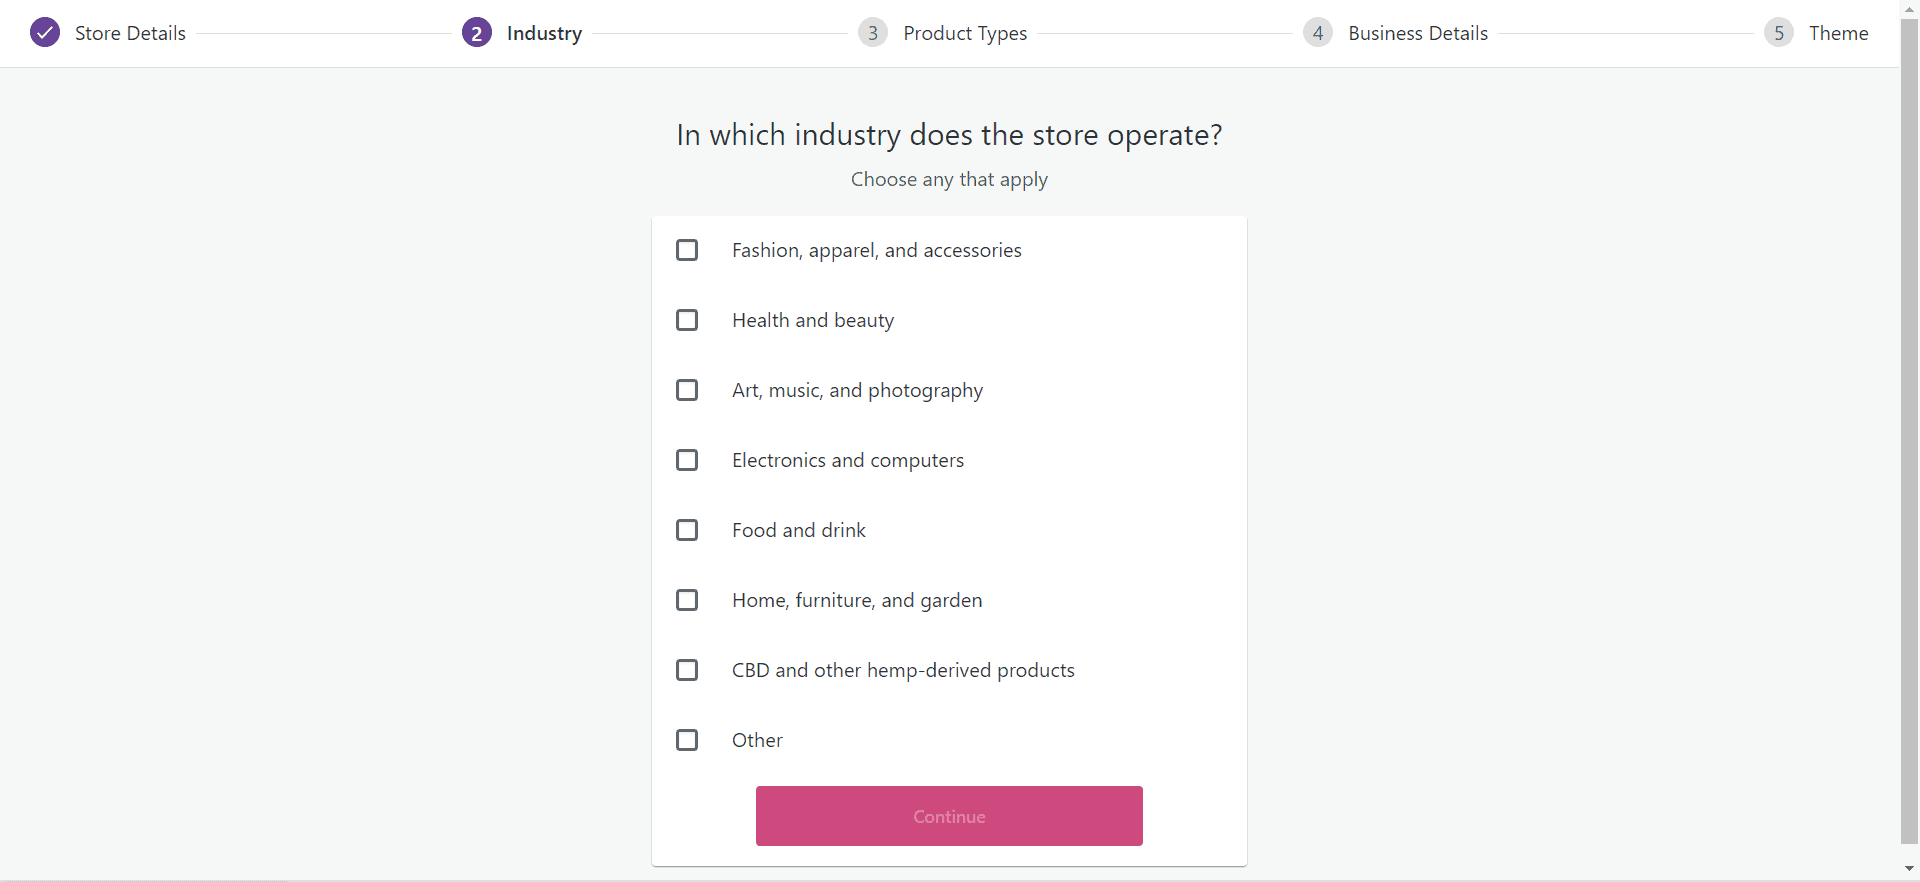
Next Steps – Describing your industry, products, and business details
Through the next pages, you’ll get to select
The industry you operate in –
The product type you offer –
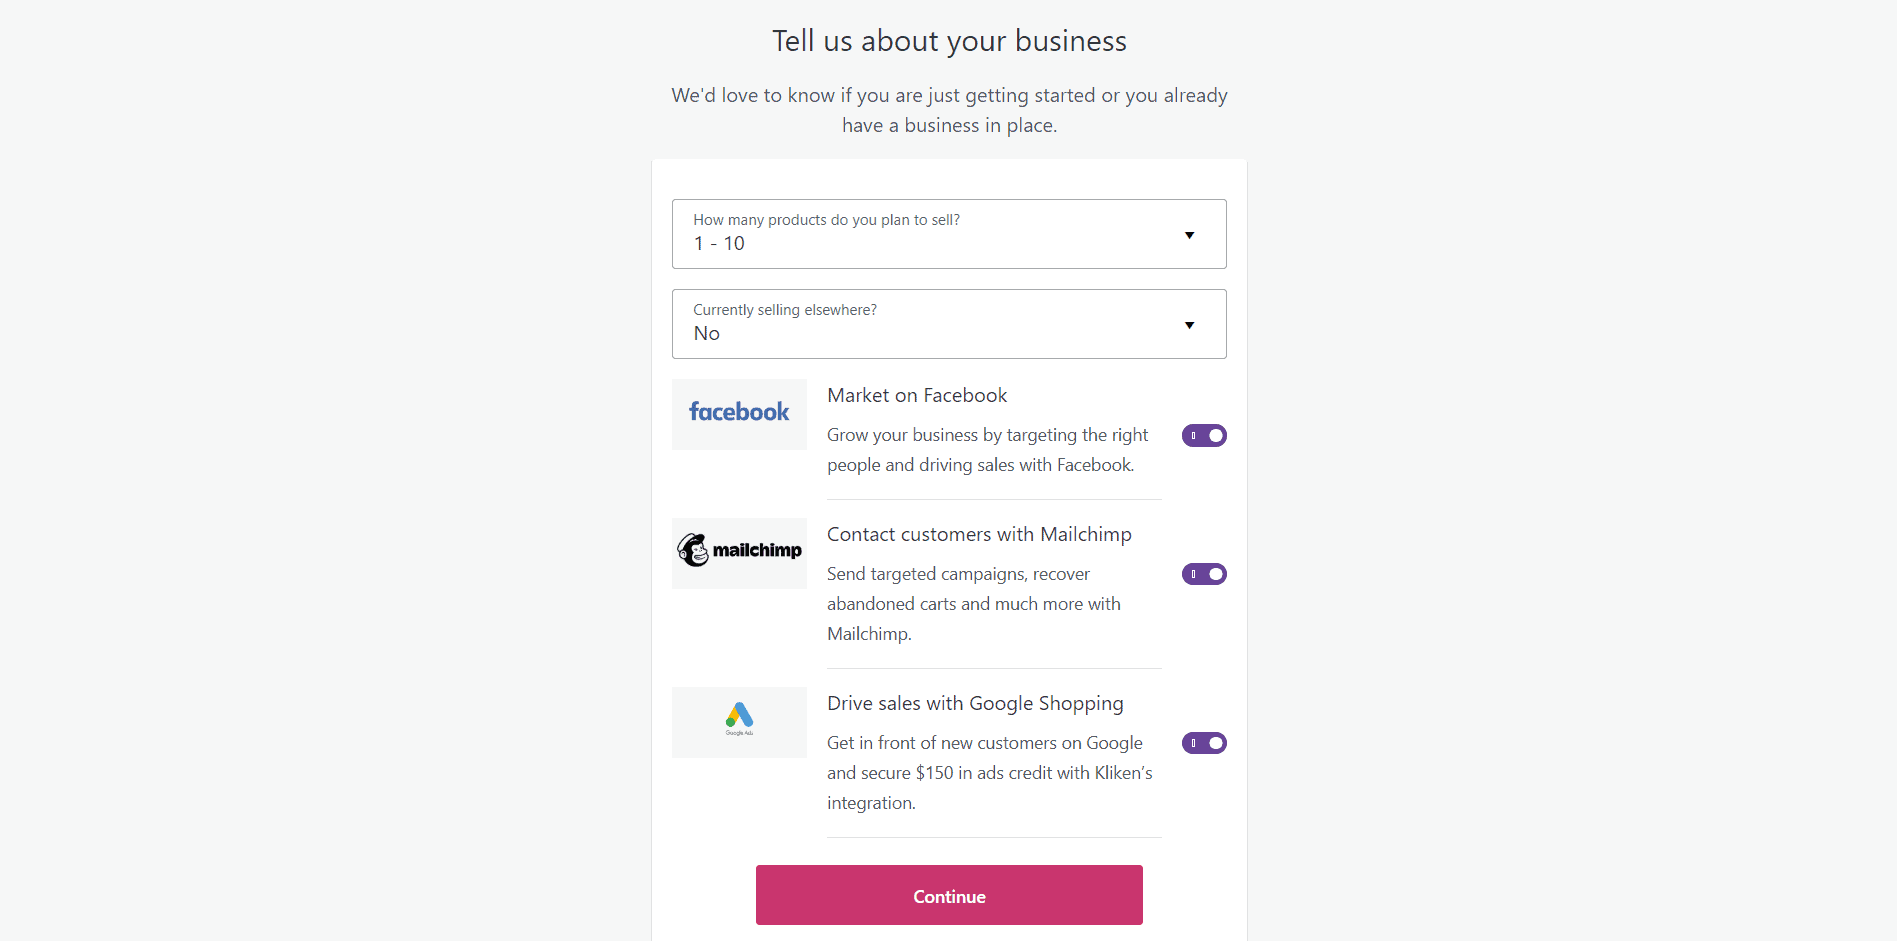
About your business and operations.
WooCommerce After The Setup Wizard
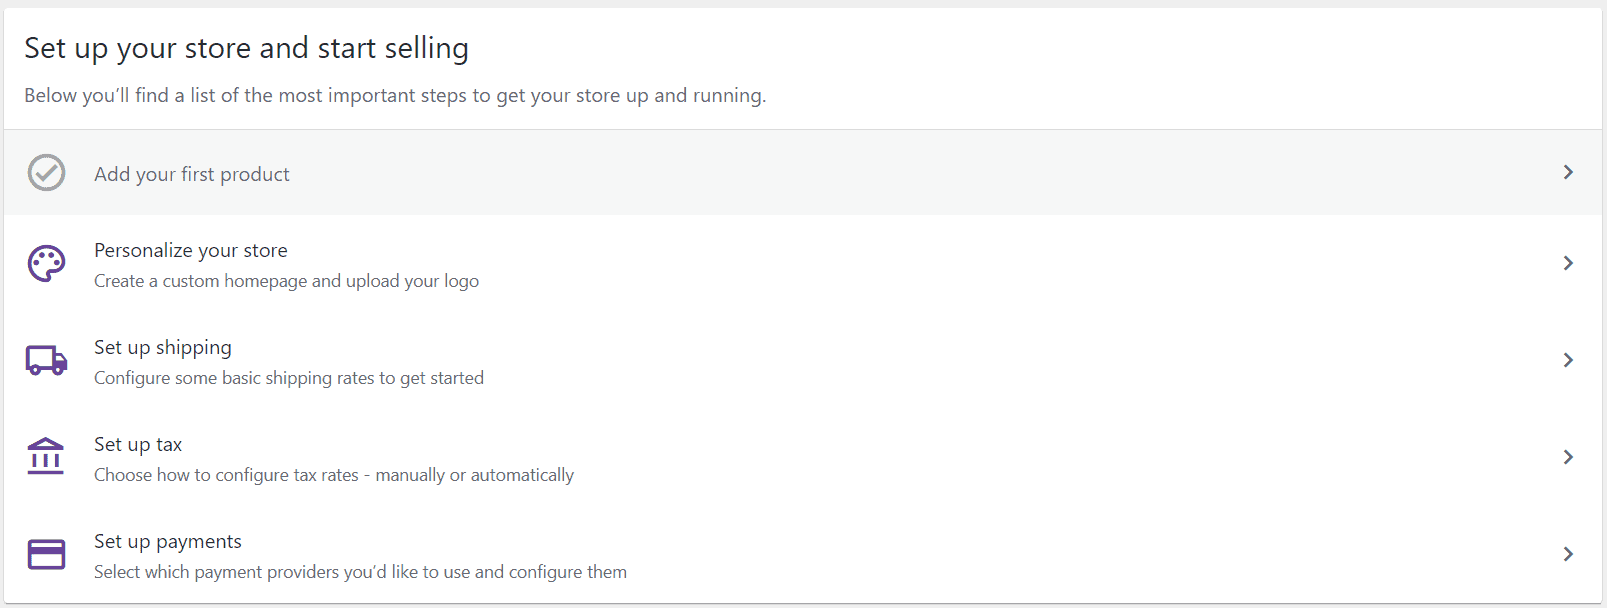
Once the setup wizard is complete, you get to the next important steps –
Adding your products,
Setting up shipping preferences
Specifying the tax rates, and
Setting up how you’ll receive your payments.
Add products to your store
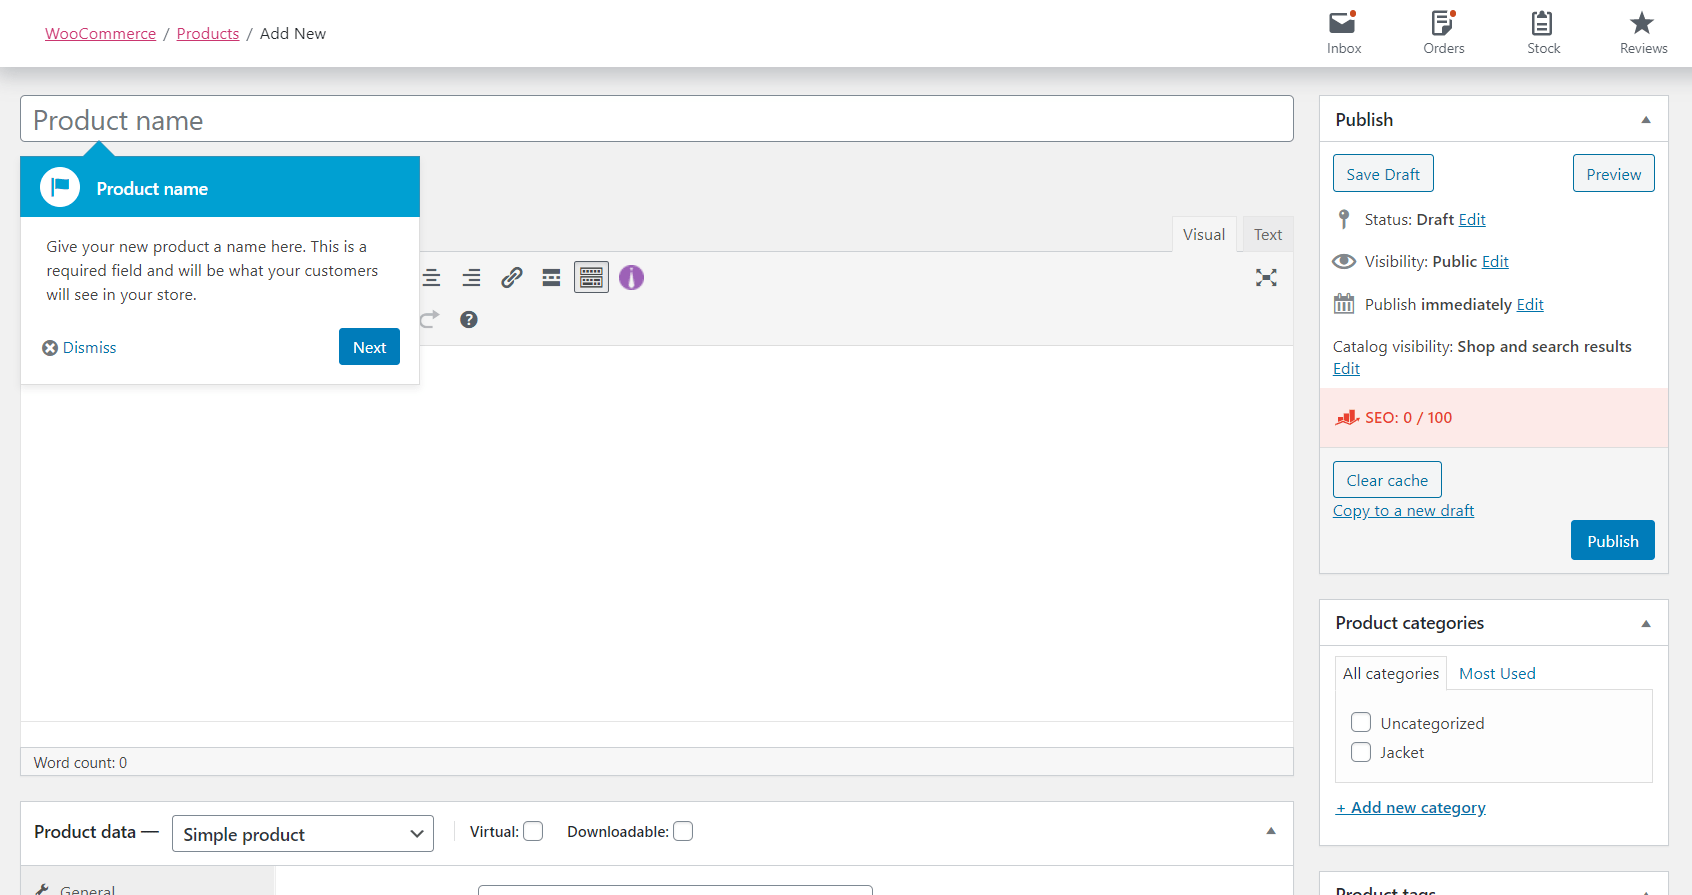
Once you’ve finished the setup, you’ll see the ‘Add your first product’ tab below the ‘Set up your store and start selling’ heading.
In case you skipped the setup-wizard walk-through, then using the side menu, you can go to ‘Settings’ –> ‘Products’ –> ‘Add New’. Then
Then you can add your product’s name, short description, and more information.
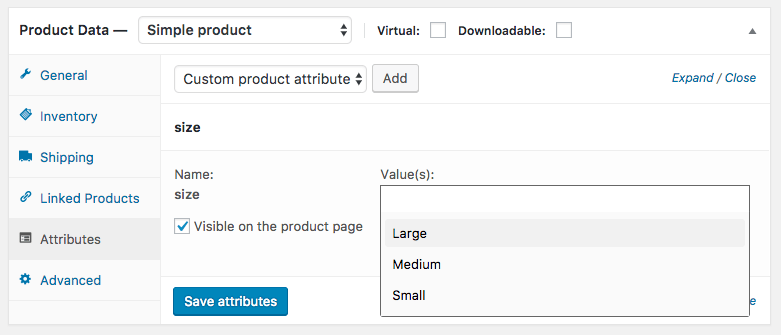
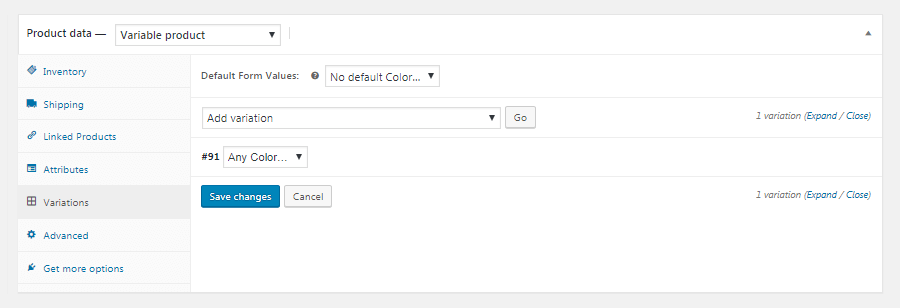
Product Data and Information
If you scroll below you will see the ‘Product data’ tab.
This tab has the sections ‘attributes’ and ‘variable products’. Attributes appear like additional details on your final page like the colour of the product, its ingredients, sizes, etc.
The ‘variable products’ option helps you create different variants of your product. For instance, you are selling t-shirts in different colours, red, green, and purple. Through this option, you can create a unique description, unique price, and so on.
Once your product is ready, you can click on ‘Publish’ and it would be live on your website, or you can complete the entire process and then get back to all products from the ‘dashboard’ menu on the side and then publish all products.
Adding Shipping and Payment Details
This step only applies in case you did not go through the set-up wizard walk-through.
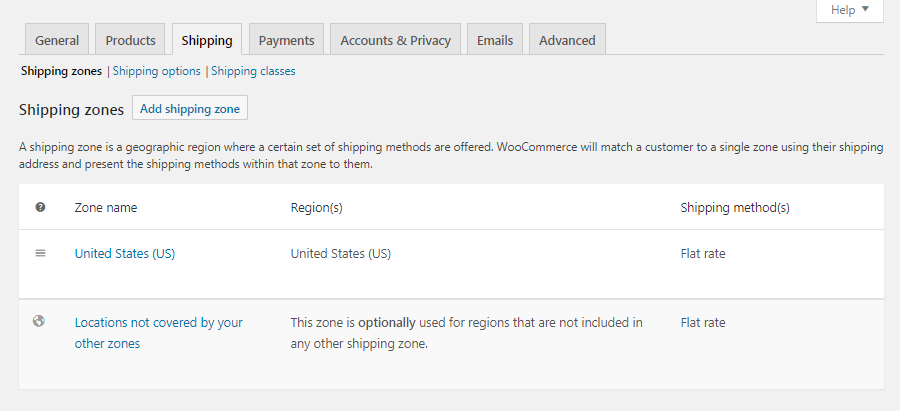
For adding your shipping details, go to ‘Settings’ -> ‘Shipping’ tab. Here you can add your shipping rates as well as differentiate them based on different prices for different regions.
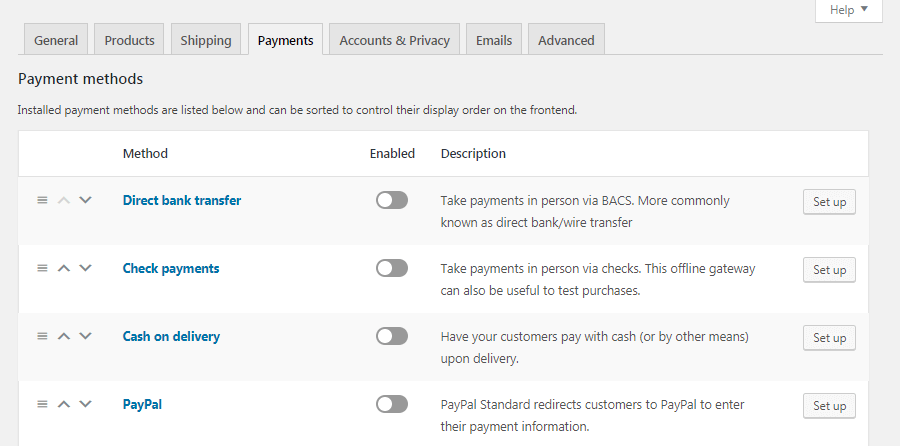
For adding your payment details, go to ‘Settings’ –> ‘Payments’ tab. Here you can see which payment methods are available and enable/disable your preferred ones.
Adding a theme for your store
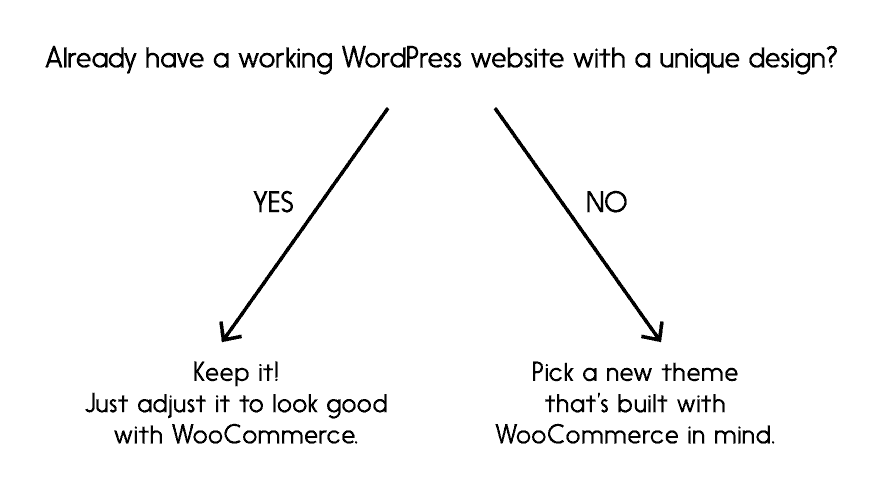
WooCommerce themes blend with whatever theme you would have chosen for your WordPress site. In order to decide whether you want a new theme or not, answer this simple question:
The default theme WooCommerce would apply to your store is called Storefront. Through the preview option, you can see what this would look like. But if you do not like the Storefront theme, the best option is to visit ThemeForest, the largest directory of premium themes for WordPress (and of course, WooCommerce).
Regardless of what theme you choose for your store, a few important steps are:
Decide how your products will be displayed Settings –> Products –> Display. Now you would be able to see how you want your products and categories to be displayed.
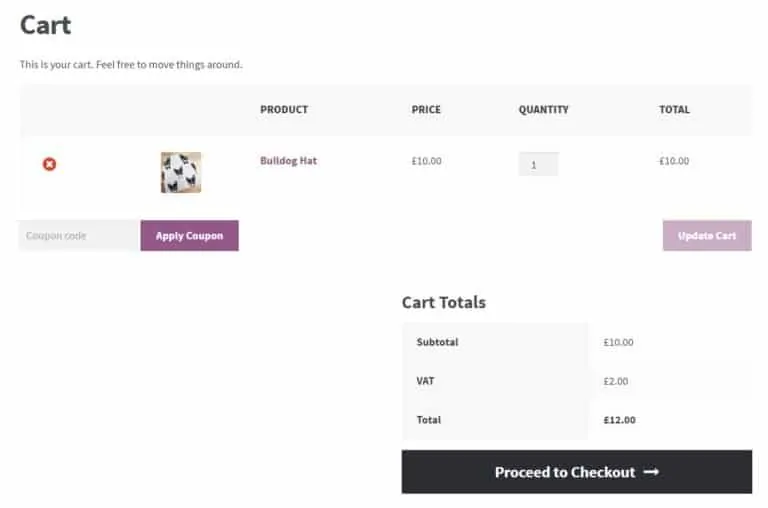
Decide how your shopping cart and checkout pages would be displayed Dashboard –> Pages. Now you can select ‘shopping cart’ page to edit and customise it according to the theme you want. Along with this, you can select ‘checkout’ page to edit and customise the same. For instance – With the default Storefront theme your shopping cart page would look like this:
Step 7 – Additional extensions
As compared to Shopify, WooCommerce provides much fuller access to you. This is because of the various extensions that you can manually add to your back-end store editing. Some extensions that we found to be helpful are:
Payment gateways – Allows you to accept more payment processors instead of the standard PayPal.
Shipping extensions – Handy if you want to integrate your store with the official shipping rates from courier and delivery companies such as UPS or FedEx.
Accounting extensions – Integrate your WooCommerce store with any accounting tool to aid your accounting and financing.
WooCommerce Subscriptions – Introduce the feature of subscriptions to your products/services by way of a weekly, monthly or annual subscription fee.