[Reader Disclosure]Our content is reader-supported. This means we may earn a commission if you click on some of our links.
AI isn’t just taking over coding, content writing or customer service.
There is now constant innovation happening in video creation as well.
For example, Google’s VEO 3 can now even create videos with audio and sound effects. Kling can now generate lifelike product demonstrations with zero filming required.
There are even several open-source AI video generators, such as Wan and Genmo, that are changing how creators create videos without big budgets.
But here’s the catch – most AI tools still struggle with longer formats (most are stuck at the 8-to-15-second mark), which works for social snippets but falls short for full ads. Moreover, there is no one-size-fits-all solution yet to create a video ad using AI.
So, you’d need to do a lot of mix and match to create a polished 30-second spot.
And then manually edit (or use AI) to piece it all together smoothly.
I know it sounds complicated, but the process is actually quite straightforward once you break it down.
Before I move into steps, here’s the tool stack we’ll be using –
Scripts – ChatGPT with search
Storyboard – Boords
Image generation – Midjourney, Reve, ChatGPT, Gemini, and Dreamina
Image to video – Sora
Video generation (with audio) – VEO 3 by Google
VO Generation (text to speech) – Eleven Labs
While there are several other AI generators that can handle these steps, I’ve found this combination works best. It makes it easier to create a video ad using AI that looks both professional and compelling
An idea doesn’t automatically lead to the final script. You need structure.
Start simple. Just answer three questions:
Who is this ad for?
What problem does it solve for them?
Why should they care?
Keep it tight. No fluff.
For example, if you’re selling a productivity app, your answers might look like this:
Who? Busy professionals drowning in tasks
What? Saves 2 hours daily by automating repetitive work
Why? More free time means less stress and better work-life balance
Type these answers into ChatGPT with a clear prompt:
You are a skilled copywriter with a knack for crafting engaging video ad scripts that resonate with your target audience. Your expertise lies in crafting concise narratives that not only capture attention but also drive action.

Your task is to write a 30-second video ad script for a product. Here are the details you need to incorporate:

- Product: __________

- Target Audience: __________

- Problem Being Solved: __________

- Key Benefit: __________

---

The script should be conversational in tone, engaging the audience as if having a friendly chat. Keep it under 200 words while ensuring the core message is clear and compelling.

---

Make sure to emphasise how the product uniquely addresses the problem and highlight the key benefit that makes it stand out from competitors.

---

Avoid jargon and keep the language simple and relatable, appealing to the emotions and needs of the target audience.
The AI will spit out multiple versions. Pick the strongest one.
Now tweak it and read it aloud. Don’t think that anything that reads correctly in your ‘mind’will sound natural when spoken. It’s a totally different story.
Does it sound natural?
If not, cut any jargon or create a prompt to simplify it further.
Here’s a trick: Record yourself reading the script. Listen back. Does it flow? Does it sound like something you’d actually say in a real conversation?
If not, keep refining.
Once it passes the “human test,” move to step 1.5.
Step 1.5 involves converting your normal script to a two-column format or a dual-column video script format. Now, this is different from a standard script.
The left column lists the visuals—what the audience sees. The right column has the audio—what they hear.
Since it’s an AI ad, you’ll want to know what visuals you need to prepare while adding your voice script to Eleven Labs. Plus, once done, you’d need to create prompts for frames you’d want in MidJourney or another AI image generator.
Here are two ChatGPT prompt continuations of the above that will convert your normal script into a dual-column format and then into prompts for the same. Just copy, paste, and tweak as needed.
Prompt 1:
"Transform this script into a video storyboard. First column should describe each scene—actions, text overlays, close-ups. Second column has the exact spoken words."
Prompt 2:
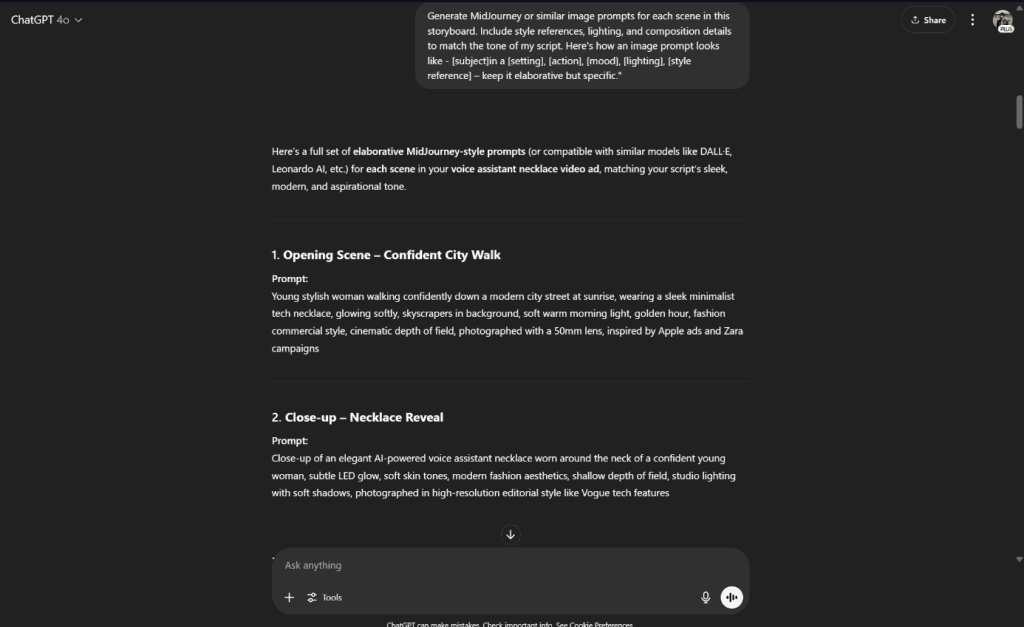
"Generate MidJourney or similar image prompts for each scene in this storyboard. Include style references, lighting, and composition details to match the tone of my script. Here's how an image prompt looks like - [subject]in a [setting], [action], [mood], [lighting], [style reference] – keep it elaborative but specific."
Now, let’s break this down.
First, take your refined script and run it through Prompt 1. This gives you a clear visual roadmap, no guesswork. You’ll see exactly what needs to happen on screen while your voiceover plays.
Next, use Prompt 2 to generate AI-friendly image descriptions. The more precise you are, the better the results. Instead of “a happy customer,” try “a woman in her 30s smiling at her laptop in a cosy home office, warm lighting, realistic style.”
Also, ensure that AI provides you with the prompt for the character and the product (if it’s not a real product).
By setting this foundation, you make it much easier to create a video ad using AI that feels polished, professional, and emotionally engaging.
Step 2: Create A Storyboard
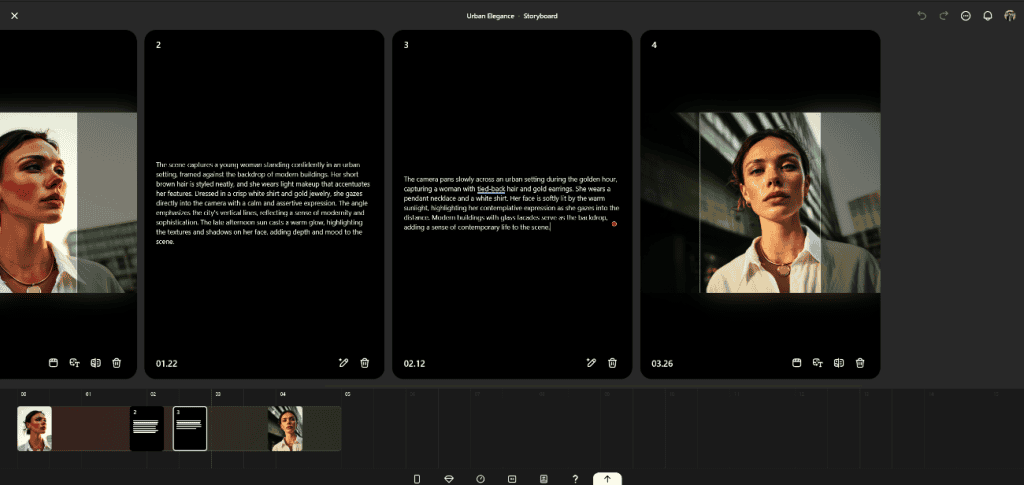
While there are several ways to do this, the simplest is to use an AI storyboard generator. Tools like StoryboardThat, Boords or even specialised tools like LTX Studio can help you create a rough sketch of your scenes.
Some might even ignore this step entirely. Big mistake. A storyboard isn’t just pretty pictures. It’s your roadmap for pacing, transitions, and consistency. Skipping it means risking disjointed visuals that confuse viewers.
Here’s how to make it painless:
Use AI tools to draft first. Upload your dual-column script prompts to tools like Booords. It’ll auto-generate scene layouts. Tweak as needed, swap angles, and adjust timing.
Keep it rough. Don’t obsess over polish. Stick figures or rough sketches are sufficient if they effectively convey the idea. The goal is clarity, not art.
Note key moments. Highlight scenes where visuals must sync with audio (product demos, emotional beats, or data reveals). These require precise timing.
Know that this step doesn’t require you to have the best AI images. It’s just that you should know what your scenes will look like before moving forward. Think of it like sketching a blueprint before building a house. You wouldn’t start hammering nails without knowing where the walls go.
Step 3: Creating Visual Assets with AI
When we refer to visual assets, we typically mean images (with consistent characters) and videos that we create using those images. A few tools currently dominate this space. MidJourney, Seedream, and Flux handle images well with consistent characters. Runway, Veo 3, Kling, Sora, and Pika Labs tackle video.
But here’s the catch: you don’t need all of them. Plus they cost a lot.
For our reference, we’ll use Sora as it comes free with ChatGPT and does a decent job of generating basic visuals. For some visuals where we require the character to speak, we can either use VEO 3 or Hedra.
Step 3.1 – Creating visuals using Midjourney
One of the great new features of Midjourney is the Omi-Reference feature, which allows you to maintain character consistency across multiple images. Just upload a reference photo, and the AI will mimic the style, colours, and features. This is huge for storytelling, where you need the same character in different scenes, especially for explainer videos or tutorials.
Here’s how you can make it work.
First take the character prompt generated using ChatGPT to generate the character of your video ad. Here’s what we got –
Now, drag the character on the top prompt field under the omni reference option in Midjourney. Select the consistency level you want. Higher settings keep details strict, while lower ones allow more creative variation.
And then start creating the scenes you sketched earlier.
Midjourney will generate variations of your character in different poses, settings, or actions. Pick the ones that match your storyboard. If something’s off—like the wrong expression or background, just tweak the prompt slightly and regenerate.
For example, if your character needs to look surprised in one scene, use the prompt “wide-eyed, mouth slightly open” to describe their expression. Need them holding a product?Just add “gripping [product name] with both hands” to the description. The AI picks up on these small details surprisingly well.
Now here’s a pro tip. Save every version Midjourney creates, even the rejects. Why? Because sometimes a “failed” image has the perfect facial expression or background for another scene. It’s like having a digital scrapbook of options. You can use that expression as a style guide for another image.
When you’ve all your images, organise them in folders that match your storyboard scenes. Label them clearly—Scene1_Character, Scene1_Background etc. This keeps everything tidy when you move to the next step.
Step 3.2 – Converting Your Images to Videos
Now this is a fun step.
Head over to Sora (or RunwayML or Kling) and upload your Midjourney images, along with similar yet video-oriented prompts. You can use an AI video prompt generator for it.
Now you have two options: either to use Sora’s storyboard or just an image-to-video generator. Play with both and see where it takes you.
Here’s how I proceeded for the video generation using Sora –
Step 4: AI-Assisted VO Generation
A good voiceover (a non robotic one) can change the entire game and can fix the small gitches your video has. So don’t skip this part.
First, choose your voice type. Do you want a friendly tone, or something more authoritative? Male or female? Young or mature?
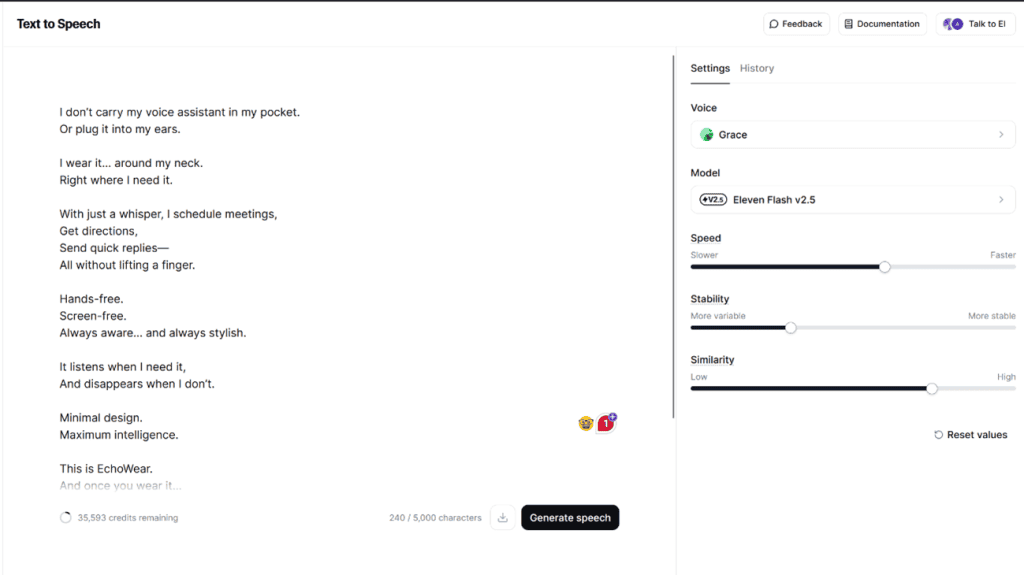
Once this is sorted, take the audio/VO Column of your script to Elevenlabs (or Dia, SpeechGen etc.). Paste in your lines and pick a voice that fits your brand.
But before you hit generate, here are some tips to getting a more natural sound from a text to speech tool –
first, make slight tweaks to your script’s punctuation. A short pause here, an emphasised word there can be added well using punctuations. Here’ an example of how I adjusted a script to sound more natural:
A simple ellipses can create a natural pause. Or a well-placed comma can make the voice sound more human.
Try saying it out loud yourself. Notice where you naturally pause or stress certain words. Then add those small details to your text.
Second, adjust the speed. Eleven labs has a slider to control the speed of the voice. A slightly slower pace can make the narration sound more natural, while a faster one works for energetic content.
Once done, add sound effects or background music (BGM), both of which you can generate using Eleven Labs or Google’s MusicFX.
Step 6: Getting It All Together
Now that you have all the pieces in place – video snippets, voiceover, and background music (BGM)- it’s time to assemble them into a cohesive final product. This is where basic editing comes in.
For beginners, CapCut or Canva’s video editor is a great option. They’re simple, intuitive, and don’t require any technical expertise. Simply drag and drop your clips, sync them with the voiceover, and adjust the timing as needed.
For advanced users, you can opt for Adobe Premiere Pro and Adobe After Effects to add those professional polish touches.
Here’s a quick tip: the key to smooth editing is proper sequencing. Start by laying down your voiceover first, then match the visuals to it. Keep transitions simple. No need for flashy effects. A clean cut often works better than a distracting transition.
Don’t forget to fine-tune the audio levels. The background music should never overpower the narration. A good rule of thumb is to lower the background music (BGM) by about 6 dB when the voiceover is active.
And that’s it – you’ve managed to create a video ad using AI from start to finish.
A startup consultant, digital marketer, traveller, and philomath. Aashish has worked with over 20 startups and successfully helped them ideate, raise money, and succeed. When not working, he can be found hiking, camping, and stargazing.
Each week I share research backed AI oriented content in my newsletter.
There are AI ideas, AI trends, tutorials, and guides.
24k entrepreneurs read it. I'd love you to join.


")


