[Reader Disclosure]Our content is reader-supported. This means we may earn a commission if you click on some of our links.
With over 2 billion active users per month, Facebook has become the place for every business to sell/market its products after Google. It’s no secret that Facebook is rivaling Google in terms of ad revenue, thanks to its increasing prominence as an alternative to sites such as Google and Amazon.
Tapping into Facebook’s vast user base can help you achieve good ROI and at the very least, help you grow your customer base.
Let’s look at the different ways you can sell on Facebook.
Facebook Marketplace has less to do with shopping and more with acting as a place where users – be it regular folk or sellers or manufacturing companies – can list their products along with a price. Those interested can view the product listing and contact the owner to buy, negotiate or inquire about the product. There are no transaction gateways to make payments on the Facebook Marketplace.
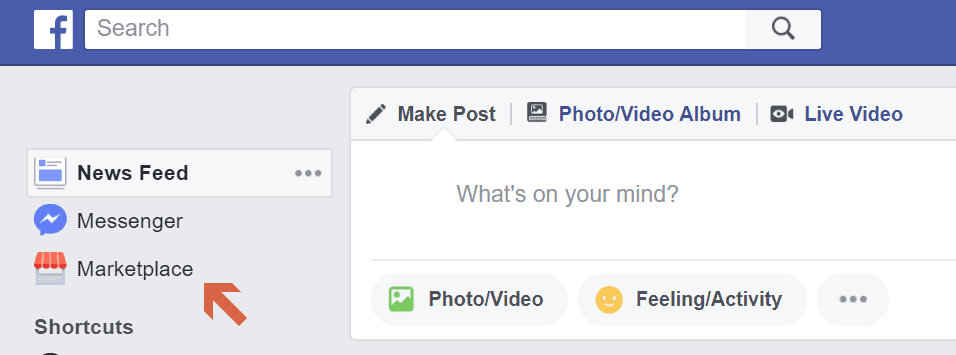
Alternately, you can access the Facebook Marketplace by logging into Facebook and clicking the Marketplace option in the menu running down the left side of your Facebook’s home screen.
Once in Facebook Marketplace, click on “+ Sell Something”
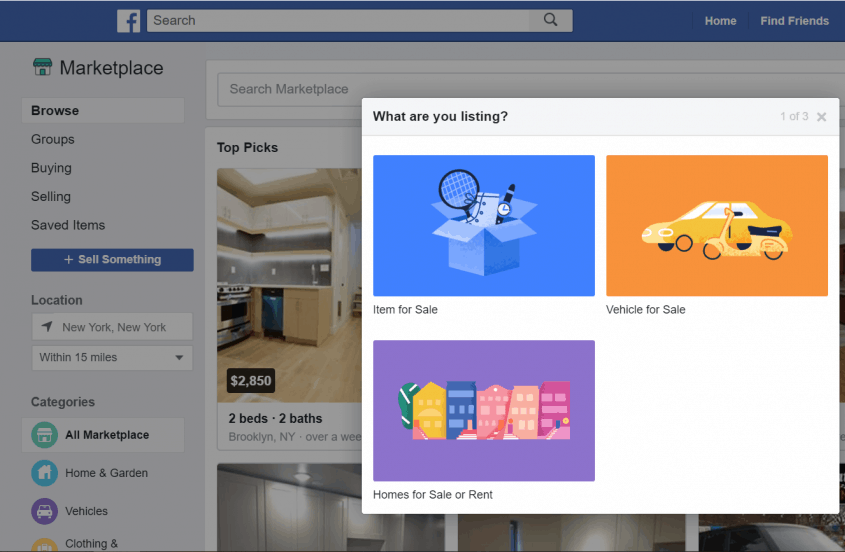
Choose what sort of product you’re trying to sell
Let’s go with “Item for Sale”
Fill in the information required about the product you’re trying to sell.
Upon filling up the relevant details, click on “Next”. You will be taken to a dialog box asking you to share it with additional groups that you are a part of for more coverage.
All that’s remaining is to promote your listing in order to increase your chances of being found on the Marketplace.
Note: Take time to go through Facebook’s Selling on Marketplace covering everything you need to know about it.
Selling On Facebook Shop
Let’s get started on selling on Facebook with the use of a Facebook Page that will act as the store for your products.
Create A Facebook Page
All you need is a Facebook Page to sell on Facebook – whether you want to have a stand-alone store or to integrate it with your existing e-commerce store/site.
Log In / Sign Up on Facebook.
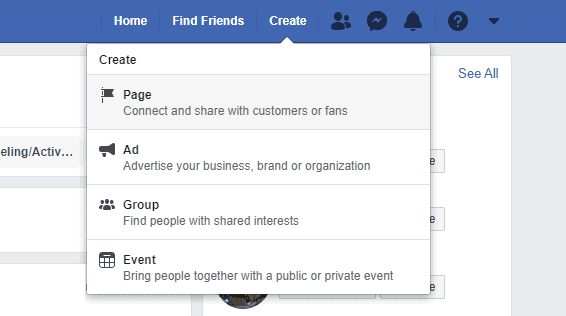
Go to Facebook Pages or click on “Create” -> “Page”
(or)
Click on “Create Page” within the dropdown arrow at the top right of your Facebook home screen
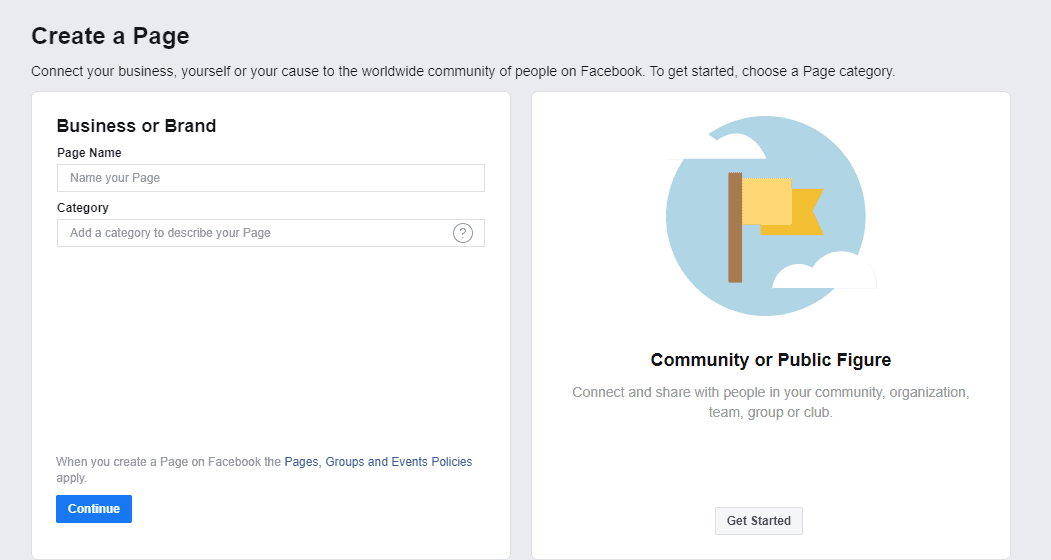
Select “Get Started” under Business or brand
Name your Page and fill in relevant details
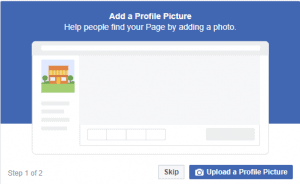
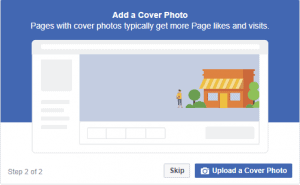
Add a profile picture and cover photo for your Page
That’s it. You’re all set to convert your Facebook Page into your online store.
Creating A Facebook Shop
Add Shop Section
A shop section is an ideal solution for those who don’t yet have a website or for those who want to complement it and/or enhance their ROI with their Facebook Page.
Log into Facebook and navigate to your Page
Select the Shop tab on your Page; if not visible you need to go to your Page’s settings, select the “Template and Tabs” section and click on the “Add a Tab” button at the bottom of the page. Find the Shop tab and click the add button – this will add it to your Page
After clicking on the Shop tab, select the checkout method and currency
You will now be able to add products to your Page by clicking on “Add Product” within the “Shop” tab. Upon clicking Add Products, you will be asked to fill out the details of your product, upload photos, set an inventory count, and delivery options. Fill them accordingly and click Save to add the product to your Page. Follow the same for the rest of your products.
Selling On Facebook Using Shopify
Shopify is one of the best and fastest-growing e-commerce website builders that are especially dedicated to building online stores in the market today.
Integrating your Shopify store to your Facebook Store is quite simple and straightforward. Here are the steps you need to follow in order to create your Facebook Store through Shopify:
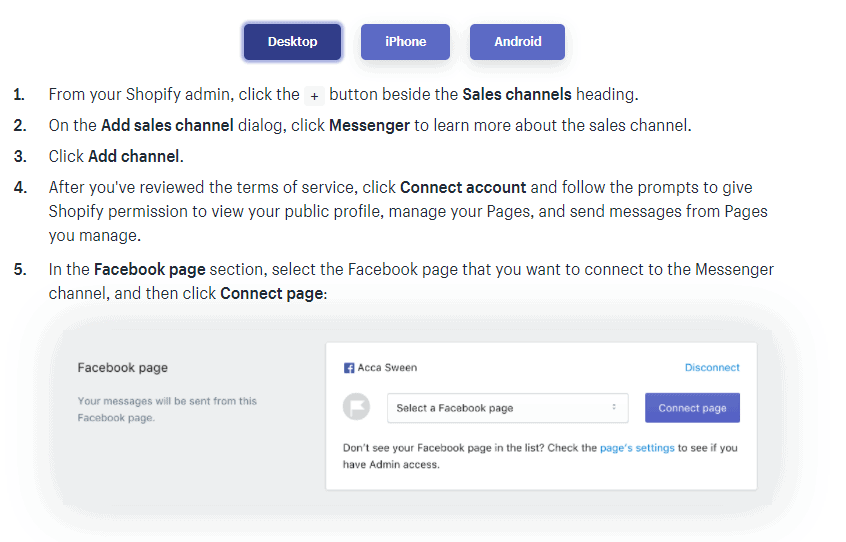
Log into Shopify and click the + button beside the Sales channels heading from your Shopify admin page
On the Add sales channel dialog, click Facebook Shop
Click on Connect Account
Connect your appropriate Facebook account and follow the prompts to allow Shopify to connect with your Facebook page.
Wait for Facebook to review your store, which can take up to 48 hours.
You will receive an email once your store has been reviewed, after which you are free to add new or already existing products from your Shopify store to appear on your Facebook Page under the “Store” tab.
The Facebook Shop app is included in all Shopify paid plans. Once you’ve set up the app and have added products to it, Facebook then creates a Store section on your Facebook page, which automatically ‘pushes’ your products to Facebook.
This displays your Shopify products and allows for people to view and buy them. This allows for the best of both worlds – you get to manage, track and process your orders using Shopify’s slick logistics and UI while combining Facebook’s ability for much better customer interaction and engagement. Your customers can even make a purchase from within Facebook if supported and configured as such.
Selling On Facebook Using Messenger
Facebook’s Messenger is not just a stand-alone messaging app – it also supports buying and selling of products from within the app itself. If leveraged properly, it goes from acting as an interaction platform with customers to becoming a proper sales channel.
As of writing, you can link Shopify-based stores to Messenger quite easily since they are provided as “Sales channels” within Shopify.
Connecting Shopify To Facebook Messenger
Connecting your Shopify store to Messenger allows for customers to be directly sent to the check-out page of your e-commerce. If your e-commerce is built with Shopify, you can follow this simple guide to connect your Shopify store and add your product catalog to Facebook’s Messenger.
Furthermore, once the client has checked out, he/she can continue to receive notifications and updates about his order.
You can either leave it at that or also include a Buy Now button which allows users to make purchases from within the app.
Now, All a customer needs to do is click on the button which will redirect him to a simple check-out procedure within the app. Information such as customer contact information and shipping and payment details will be automatically synchronized with your Shopify profile, without any further effort.
Add Messenger’s Live Chat To Your Shopify Store
The Messenger Live Chat app allows the visitors of your online store to start a chat using their Facebook account.
To integrate Facebook Messenger Chat to your store, you can follow this guide.
This proves to be quite valuable since the engaged visitors can then be converted to become customers. Unlike other Live Chat tools, once initiated, the conversation can go on even after leaving your store. You can use Facebook Business Manager or any third-party platforms in order to manage chats from this channel.
Add Chatbots To Messenger
Apart from Live Chats, Messenger also has the ability to add Chatbots. They allow for a quicker and tailored customer experience. The Chatbots can help in a variety of situations, say handling a large volume of messages from potentially interested buyers at the beginning after which you can funnel the interested customer into a dedicated chat.
There are many ways with which you can add a Chatbot to Messenger. In case you have no idea where to start, the easiest is to use online chatbot building services such as ChatBot or Chatfuel to build one.
Advertising on any platform could use a separate post of its own, but for simplicity’s sake, Hootsuite classifies Facebook ads into:
Image Ads
Video Ads
Poll Ads
Carousel Ads
Slideshow Ads
Collection Ads
Dynamic Ads – AR, VR, Messenger & Stories
Advertising Using Facebook Ads
Facebook provides a simple and easy-to-use Ads Manager for businesses to start an ad campaign. Here’s how you create your Facebook Ad Campaign for your store or products:
Click Create to get started with a new Facebook ad campaign.
Choose a campaign objective.
Fill in the name for your selected campaign.
Select the appropriate options for your selected campaign.
In case this is your first ad campaign on Facebook, you will be prompted to Set Up Ad Account – create your Facebook Ad account via that and proceed to the next step. If not, you can just click on Continue.
Proceed to configure your ad campaign for optimum reach and views.
Finally, choose your ad format and click on Confirm.
That’s it! You’ve got your Facebook Ad Campaign up and running.
Go On, Tell Us What You Think!
Did we miss something? Come on! Tell us what you think about our article on How to Sell on Facebook in the comments section.
Started out to become a developer but felt at home in the home of startups. The journey started from a single novel. Been an entrepreneur since schooling days. Interested in coding, reading and movies.
Each week I share research backed AI oriented content in my newsletter.
There are AI ideas, AI trends, tutorials, and guides.
24k entrepreneurs read it. I'd love you to join.